We recently had a client sign up to use HubSpot as their marketing automation platform. Which was fantastic... until they sent us their contact list which was over 70,000 people strong! If we simply imported this list as is it would blow out their contact allowance on HubSpot and cost them $3000 more per month to market to these contacts.
We also had concerns about how lively these 70k worth of contacts were. The last thing we want to do is get a lot of bounces, unsubscribes and spam complaints in HubSpot which could mean future targeted email campaigns being marked as spam.
The Solution: Email them via another platform first
We decided to test out these contacts via another platform first with a juicy offer to see if they were actually valid email address. We chose Sendgrid for this as they also have an excellent API and we use them for a lot of transaction style emails for our other developments.
One of the biggest perks of using Sendgrid is whenever someone clicks, opens or unsubscribes it will send a notification to anywhere we like. This meant we could automatically subscribe the contact instantly into HubSpot when they either opened or clicked on an email. We also unsubscribed them from HubSpot if they hit the unsubscribe link.
Nerd time: How we did it
If you're not into the techy stuff you can stop reading now and email this link to your IT guy. Or contact us and we can do it for you... :)
Setting Sendgrid up for Maximum email deliverability
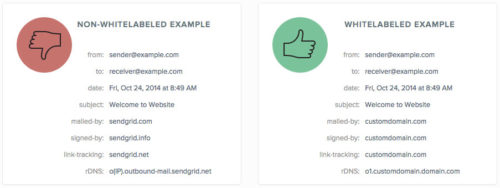
First you want to start setting up the domain name properly so you emails get signed while being sent. Sendgird is great here as it allows you to whitelabel your domain and even your tracking links in the email itself.
"Whitelabels allow you to send through your own custom domain instead of SendGrid's default settings. This will mask the header information of your emails with your data--not ours--and will improve your email deliverability."

To configure this log into your Sendgrid account. Then navigate to: Settings >> Whitelabels and follow the instructions under Domains & Email Links. You will need access to your domain name servers to configure these settings.
Now you will be able to send emails that are signed and should have no problems being delivered.
Getting the clean contacts into HubSpot Automatically
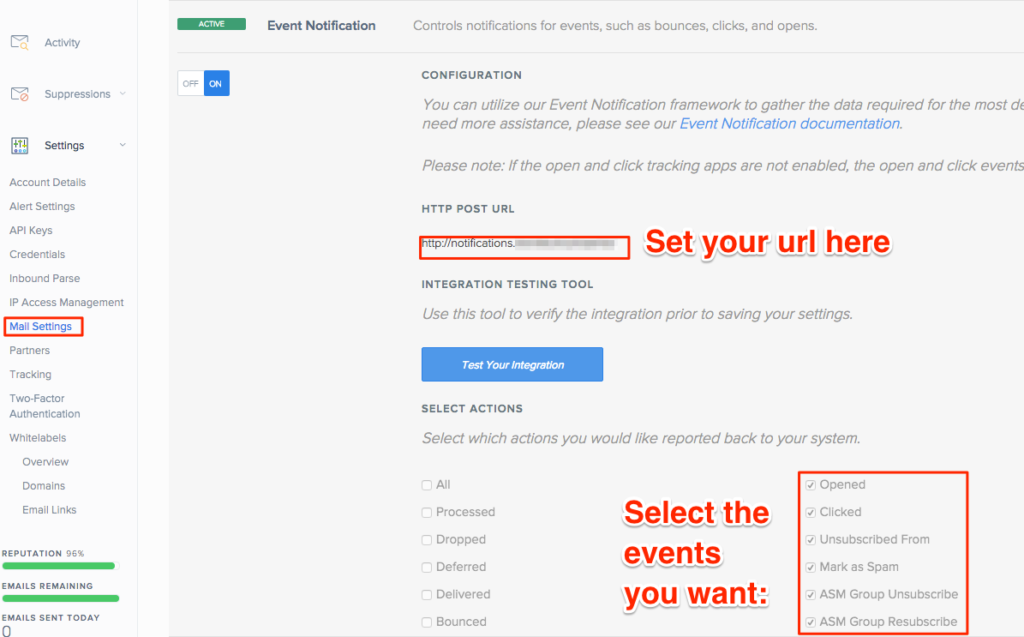
Now we know these contacts are alive and kicking we want to get them into HubSpot ASAP. Sendgrid has a great event notification webhook. When someone interacts with your email (clicks, opens etc) it will fire a notification back to any URL you want.
With a little programming we can process these notifications and insert the contact instantly into HubSpot via their API. The benefit of this is we can then enrol the contact into any HubSpot marketing campaign / workflow automations we like and keep the conversation going.
To configure this: Settings >> Mail Settings >> Event Notifications

Processing the Event Notifications
Now the tricky part begins. We need to create a program that will accept the notifications. Process them. And insert the data back into Hubpsot.
The basic flow is:
- Receive the notification
- Extract the event and email info from it
- If you want additional data you will need to pull this from your own database (Sendgrid only sends their email address). Simply import your data to MySQL and then select what you need.
- On click or open perform a fake form submit via the HubSpot API and push the contact into HubSpot
- On unsubscribe also make sure you unsubscribe them from HubSpot
Because I'm super nice you can download a copy of the script I wrote here. You will still need to modify it for your needs:
- Change the HubSpot port id $Hubspot_Portal_ID in 2 locations (sorry was lazy - lines 5 & 181)
- Create a form in HubSpot and grab the form ID and replace it with this on line 168
- Replace any database calls for your own
- Replace the HubSpot API key ($hapikey) on line 186
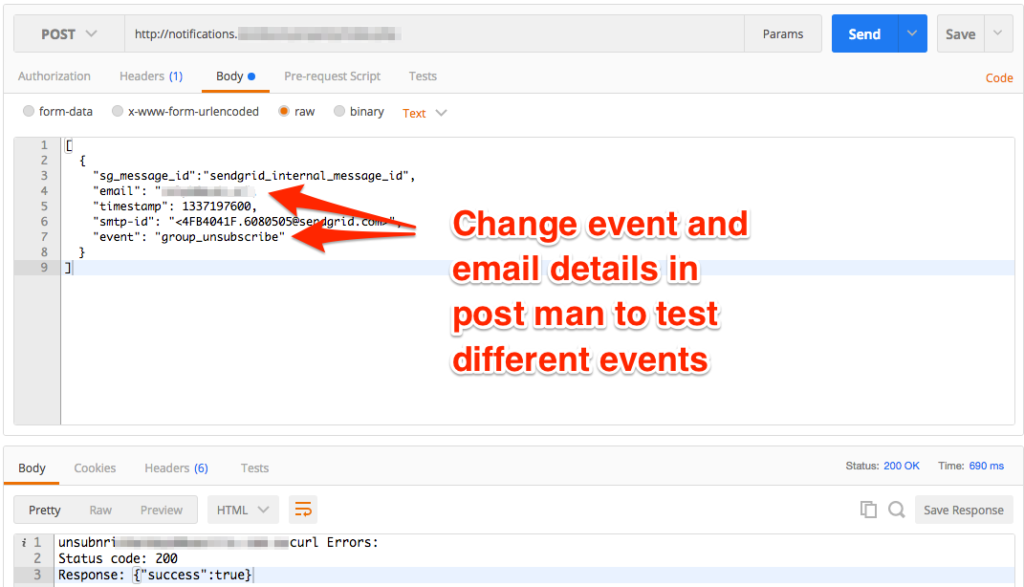
- Tip: Speed up testing by using Google Chrome Postman extension (you will be able to debug much quicker and see any errors)
Postman in action:

Check out the documentation here for API info:

 Back to blog

